Basic Skills
Objective
By the end of this course, you will be sailing on your own in light wind conditions without assistance from your instructor.
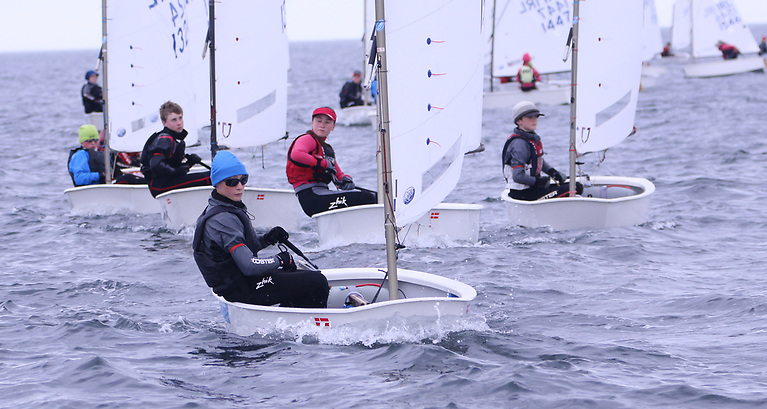
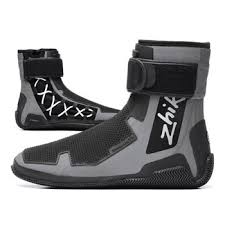
Clothing and Equipment: Essential Preparation for Sailing
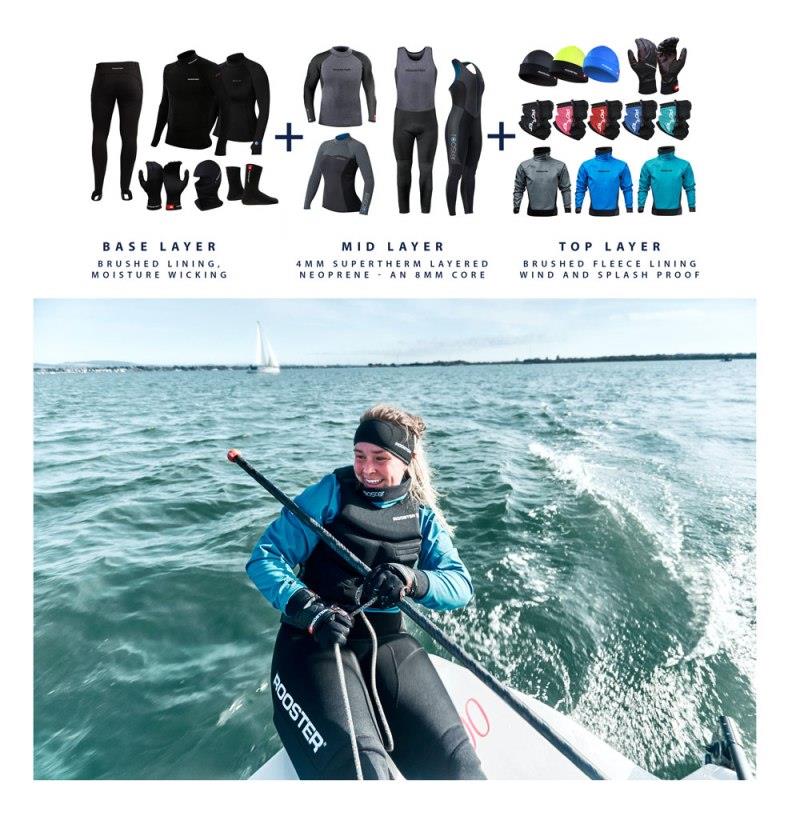
Personal Preparation: Clothing Choices
.jpeg)
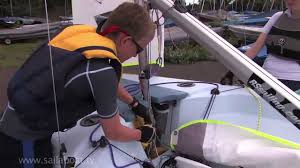
Boat Preparation: Essential Equipment and Checks
You'll develop a routine for preparing your sailing boat for use, ensuring it is properly equipped and structurally sound.
- Equipping a Sailing Boat for Use: You'll learn to equip a sailing boat for use by ensuring all necessary items are on board and correctly stowed in accessible locations. This typically includes:
- Mandatory Safety Gear: Confirming the presence of essential safety equipment, such as a correctly sized Personal Flotation Device (PFD) for every person on board, a reliable bailing device (like a bucket or sponge) for removing any water that enters the boat, and a painter (a strong line attached to the bow for mooring or towing).
- Sailing Specific Components: Ensuring the sails, rudder, and daggerboard/centreboard are present, correctly assembled, and ready for efficient deployment.
- Emergency & Contingency Gear: Including a basic first-aid kit, a whistle for audible signalling, and, particularly for smaller boats, a pair of paddles or oars as an alternative means of propulsion in case of no wind or equipment failure.
- Checking Integrity of Hull, Buoyancy, Rigging, Spars & Foils: You'll learn to systematically check the integrity of the hull, buoyancy, rigging, spars & foils before every sailing trip. This detailed pre-sail inspection helps identify any potential issues that could compromise safety or performance during your time on the water:
- Hull & Buoyancy: Conduct a thorough visual inspection of the hull for any visible cracks, punctures, dents, or signs of damage. For boats with integrated buoyancy tanks (sealed air compartments), ensure they are airtight and integral. If the boat relies on inflatable buoyancy (e.g., dinghy tubes), check for proper inflation and absence of leaks.
- Rigging: Carefully examine all lines (including halyards for raising sails, sheets for controlling sails, and other control lines) for any signs of fraying, kinks, excessive wear, or damage. Confirm that all shackles, clips, and other connecting fittings are secure and operating smoothly.
- Spars: Inspect the mast and boom (the main support structures for the sails, collectively known as spars) for any unnatural bends, cracks, or structural damage. Verify that all fittings attached to the spars (e.g., cleats, blocks) are tight and secure.
- Foils: Examine the rudder and daggerboard/centreboard (the underwater components that provide steering and prevent leeway, collectively known as foils) for any cracks, chips, excessive wear, or damage. Ensure they are securely attached to the boat and can be deployed and operated smoothly without excessive play.
- Overall Condition: Beyond these specific components, cultivate a general awareness for anything that seems loose, worn, out of place, or not functioning as expected. Addressing these minor issues ashore can prevent major problems afloat.
Rigging
You'll develop the proficiency to prepare a sailing boat independently for use on the water. Review Rigging from the Start Sailing course for basic rigging techniques.
Rigging the Boat for Use
- Can rig a boat for use on their own: You'll develop the proficiency to prepare a sailing boat independently for use on the water. This involves a systematic process of assembling the boat's components and setting up the rigging, ensuring everything is correctly and securely attached. This includes:
- Assembling Mast and Boom: Attaching the mast to the boat and the boom to the mast.
- Attaching Sails: Properly hoisting and attaching the mainsail and jib (if applicable) to their respective spars and halyards.
- Connecting Running Rigging: Threading all sheets and control lines through their correct blocks and cleats, ensuring they run freely and are ready for adjustment.
- Setting Foils: Inserting and securing the daggerboard/centreboard and rudder.
- Initial Trim Settings: Setting up basic sail controls like mast rake (how much the mast leans backward or forward, influencing helm balance) and initial tension on the boom vang/kicker (a rope system that pulls the boom down, controlling leech tension), based on expected conditions.
Sail Selection and Reefing Decisions
- Can make appropriate decisions as to what sails to use or whether they should reef: You'll learn to assess the prevailing wind conditions and make informed choices about your sail plan to ensure both safety and optimal performance. This includes:
- Sail Choice: For boats with multiple sail options (e.g., different sized jibs/mains), you'll learn when to opt for a smaller or larger sail based on wind strength.
- Reefing Decision: Understanding the signs of needing to reef (e.g., excessive heeling, loss of control, heavy helm) and deciding when it's necessary to reduce the sail area by reefing. This decision prevents overpowering the boat and ensures a safer, more controlled sailing experience in stronger winds.
Sail Controls: The Outhaul
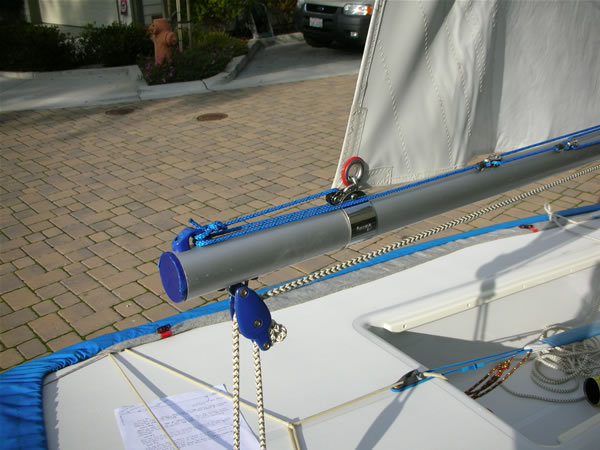
- Can identify effect of outhaul on the sail and its use in lighter & stronger winds: You'll understand the specific function and impact of the outhaul control line on your mainsail, and how to use it effectively in varying wind conditions:
- Effect on Sail Shape: The outhaul pulls the foot of the mainsail along the boom. When pulled tight, it flattens the sail (removes draft from the lower part), making it less powerful. When eased, it allows the sail to become fuller, creating more power.
- Use in Lighter Winds: In lighter winds, you'll ease the outhaul to make the sail fuller and deeper, generating maximum power to propel the boat.
- Use in Stronger Winds: In stronger winds, you'll tension the outhaul to flatten the sail, depowering it to reduce heeling and maintain control, often in conjunction with reefing.
Reefing Techniques
- Can rig a slab or roll reef boat while on the trolley: For dinghy sailors, you'll practice and become proficient at reducing your mainsail area while the boat is safely on its launching trolley ashore. This involves either:
- Slab Reefing: Learning the process of lowering the sail slightly, securing a new tack point, pulling down on a new clew point, and tying off the excess sail material.
- Roll Reefing: Understanding how to use a rolling mechanism to wrap the sail around the mast to reduce its area. This shore-based practice helps you develop the memory and understanding necessary for future reefing afloat.
Ropework: Essential Knots for Sailing
Mastering fundamental knots is a vital skill for every sailor, ensuring safety, efficiency, and control when handling lines on board. You'll learn to tie critical knots and understand their practical applications.
You'll develop the practical skill to tie two essential knots, understanding their specific characteristics and when to apply them in a sailing context.
The Bowline:
- How to Tie: You'll learn the steps to tie a Bowline reliably and efficiently, creating a secure loop at the end of a rope.
- Characteristics: This knot is renowned for creating a strong, non-slipping loop that will not tighten under strain. It is also relatively easy to untie even after being heavily loaded.
- When to Use It: The Bowline is incredibly versatile and is used in a wide range of sailing scenarios where a fixed, non-slipping loop is required. Common uses include:
- Creating a rescue line: Forming a loop to place around a person to pull them from the water.
- Attaching halyards to sails: Securing the rope that hoists the sail to the sail's head.
- Securing fenders: Attaching fenders to stanchions or rails to protect the boat.
- Anywhere a secure, non-slipping loop is needed.
The Clove Hitch:
- How to Tie: You'll learn how to tie a Clove Hitch quickly and effectively around a spar, rail, or post.
- Characteristics: This knot is useful for making a quick, temporary attachment to a cylindrical object. It holds well when there is constant tension but can slip if the load is intermittent or if the object it's tied to is too smooth.
- When to Use It: The Clove Hitch is frequently used for:
- Temporarily securing fenders: Attaching fenders to guardrails or stanchions.
- Attaching a line to a mast or boom: For securing a temporary line, though care must be taken with intermittent loads.
- As a quick temporary tie for gear: On deck or in the cockpit when a fast, easily releasable attachment is needed.
Sailing Techniques & Manoeuvres
Boat Control
- Paddling/Rowing and Coming Alongside: You'll hone your ability to paddle or row a boat around a triangular course and come alongside a specific point or another boat. This involves maintaining a straight line while paddling, executing controlled turns using paddle strokes, and judging momentum to approach a target smoothly and gently alongside, ready to secure the boat.
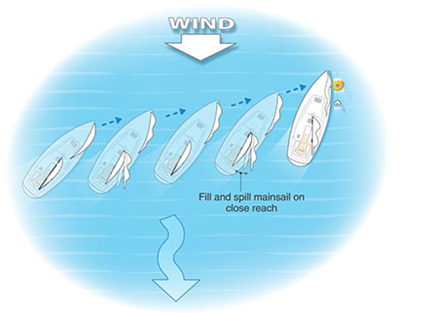
- Precise Stopping: You'll practice stopping your boat precisely at a chosen spot. This skill involves understanding how to use the wind and your steering to progressively reduce boat speed, bringing the boat to a controlled halt exactly where intended, often by turning "in irons" or luffing sails. (fill and spill)
- Speed Control (Accelerating/Decelerating): You'll learn to actively control your boat's speed. This is achieved by adjusting your sails (trimming in to accelerate, letting out to decelerate or depower) and subtle steering adjustments. You'll understand how to generate or reduce power to sail faster or slower as needed.
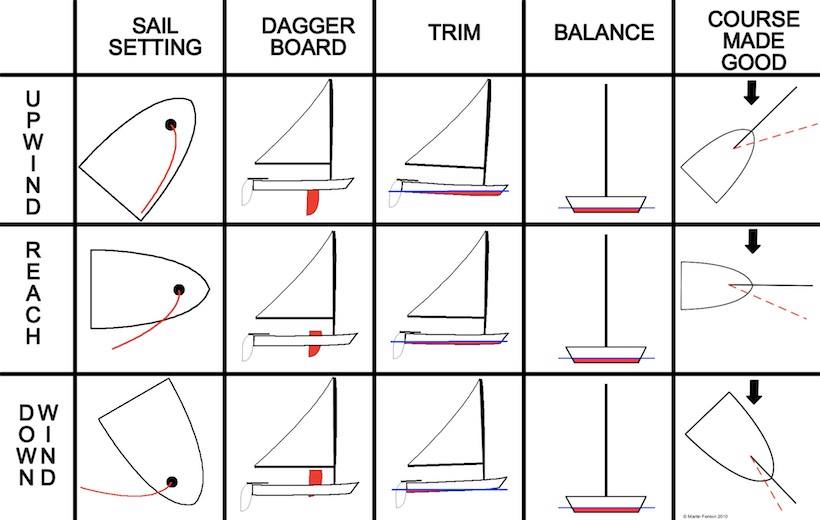
The 5 Essentials:
You'll learn to describe "The 5 Essentials" and apply them to all points of sailing. These are fundamental elements that, when managed correctly, ensure efficient and controlled sailing:
- Course Made Good: This refers to the actual path your boat takes over the water, considering the effects of wind, current, and your steering. You'll learn to maintain your desired direction and adjust achieve the most efficient path towards your destination.
- Sail Setting: This involves correctly adjusting your sails (trimming in or letting out sheets, adjusting outhaul, vang, etc.) to optimize their shape and angle to the wind for maximum power and efficiency, whether sailing upwind, downwind, or across the wind.
- Boat Balance: This is about keeping the boat flat and upright. You'll learn to use your body weight (hiking out) and sail trim to counteract the force of the wind, preventing excessive heeling (leaning over) which can slow the boat down or make it difficult to control.
- Boat Trim: This refers to the fore-and-aft balance of the boat in the water, achieved by the placement of crew weight. Proper trim minimizes resistance and helps the boat perform optimally by keeping the bow and stern at the ideal depth.
- Daggerboard/Centreboard: You'll learn to adjust the depth of your daggerboard or centreboard. Lowering it fully provides maximum lateral resistance for sailing efficiently upwind, preventing leeway (sideways drift). Raising it partially or fully reduces drag when sailing downwind, allowing for greater speed. You'll continuously apply these principles to optimize your boat's performance on every point of sailing.
Core Sailing Manoeuvres
- Reaching, Upwind, and Downwind Sailing: You'll reinforce your ability to reach across the wind, sail upwind (close-hauled, zig-zagging against the wind), and sail downwind (running or on a broad reach). This involves consistent course keeping, appropriate sail trim for each point of sailing, and maintaining boat balance.
- Tacking and Gybing: Your turns, both tacking (turning into the wind) and gybing (turning away from the wind), will become effortless and controlled. You'll focus on executing these manoeuvres with smooth, coordinated movements between helm and crew, making your boat appear to turn gracefully. You'll ensure boat speed is maintained through the manoeuvre, maintain awareness of other water users, and maintain control before, during, and after the turn, coordinating with your crew.
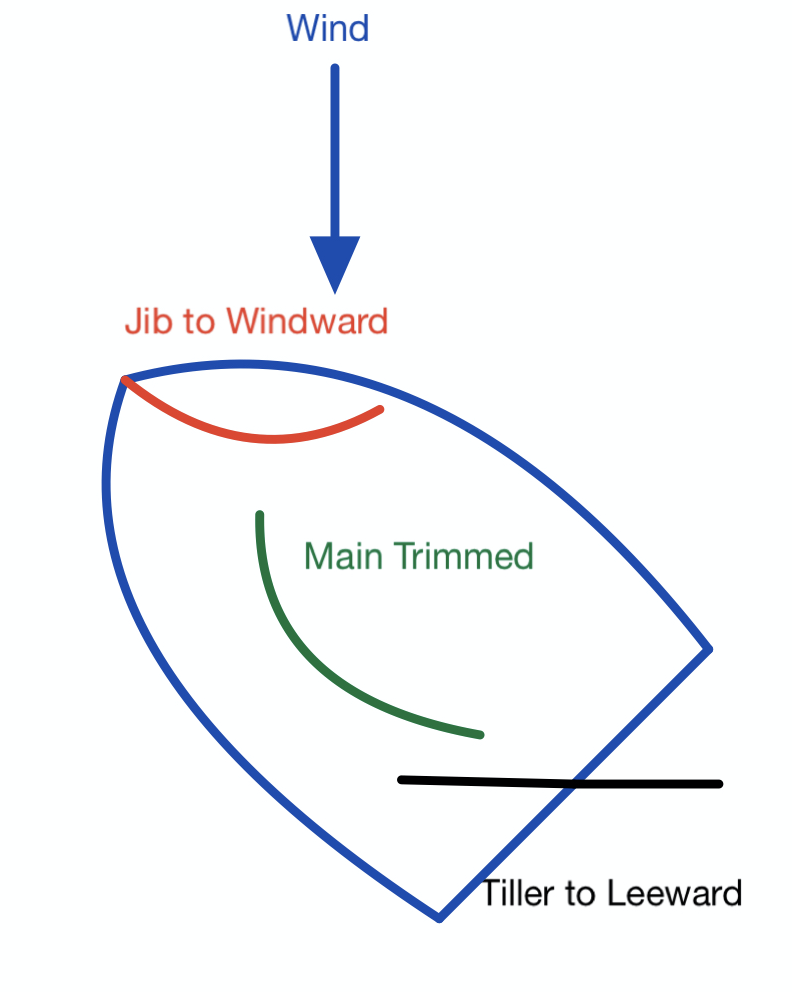
- Heaving To: You'll learn the technique to heave to, which is a method of effectively stopping the boat while maintaining some steerage. This involves sheeting the jib to windward and having the rudder turned to leeward, allowing the boat to drift slowly sideways, providing a stable platform for a break, consultation, or to wait out a squall.
- Sailing Under Jib Only: You'll learn the technique of sailing under jib only. This involves lowering or furling the mainsail and using only the smaller jib to propel the boat. This can be useful in very strong winds when the mainsail is too powerful (coming ashore with an onshore breeze) or if the mainsail or its rigging is damaged.
Docking and Mooring
- Leaving and Returning to a Beach or Slipway (Light Winds): As both helm and crew, you'll practice how to leave and return to a beach or slipway in the prevailing wind direction in light winds. This involves understanding how to manage the boat's momentum, steer gently away from or towards the shore, and handle the sails efficiently for a smooth departure or arrival without power.
- Landing on a Beach or Slipway (Various Wind Conditions): You'll gain a detailed understanding of how to land on a beach or slipway effectively and safely when the wind is:
- Offshore: Approaching with more sail area, using the wind to push you in, but controlling speed carefully.
- Cross-shore: Using controlled turns and potentially a "ferry glide" (crabbing sideways) to offset the wind's push.
- Onshore: Approaching with minimal speed, possibly depowering sails early (jib only if needed), and using the wind to bring you to a gentle stop against the shore. You'll learn to anticipate the wind's effect on your approach and adjust accordingly.
- Picking Up and Leaving a Mooring: You'll learn the steps to safely pick up and leave a mooring buoy. This involves precise boat handling to approach the buoy, secure your boat to it using a painter or mooring line (round turn 2 half hitches), and then smoothly sail away from it when ready, coordinating sail trim and steering to clear the buoy and other vessels.
- Coming Alongside and Leaving Piers/Pontoons (Head to Wind): You'll practice how to come alongside and leave a boat, pier, or pontoon that is head to wind (i.e., the wind is blowing directly off the dock/boat). This involves approaching slowly, using the wind to help you slow down, and then powering away directly into the wind for departure. (same approach as mooring)
- Coming Alongside and Leaving Piers/Pontoons (Not Head to Wind): You'll also learn to come alongside and leave a pier or pontoon that is not head to wind (e.g., cross-shore or stern-to-wind). This requires more control of boat momentum, wind effects, and sail trim to execute controlled approaches and departures, using careful steering to offset the wind.
Man Overboard Recovery:
This is a crucial safety skill. If someone falls out of the boat (man overboard), you'll learn a quick and safe way to turn your boat around and get them back on board. This involves executing a specific manoeuvre aimed at getting back to the person as fast as possible and safely alongside for recovery. You'll also practice the steps for recovery (e.g., getting a line to the person, assisting them back into the boat).
Capsize Recovery
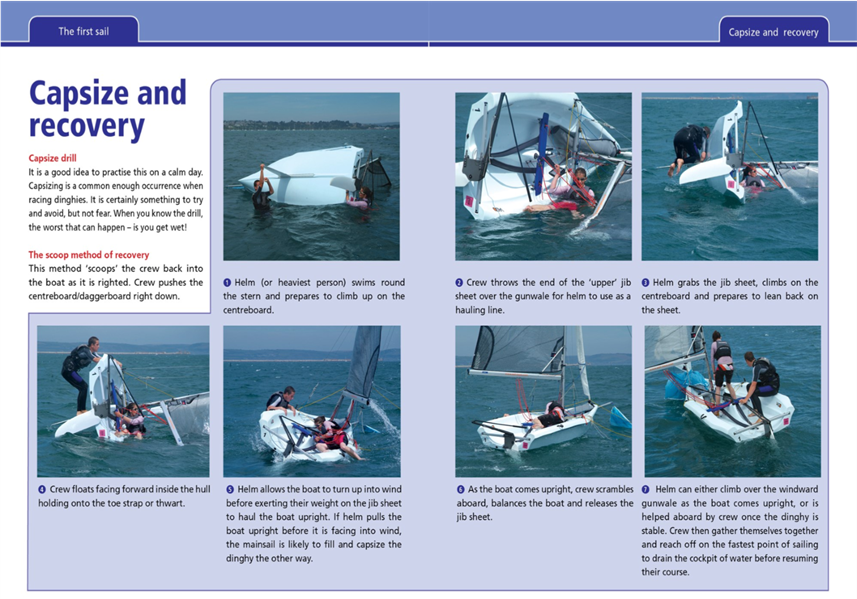
You'll become an expert at righting a capsized boat using a special technique called the "scoop method." Review Capsize Recovery from the Taste of Sailing course for initial guidance.
Sailing Knowledge: Principles of Sail Trim and Collision Avoidance
How Your Boat Moves
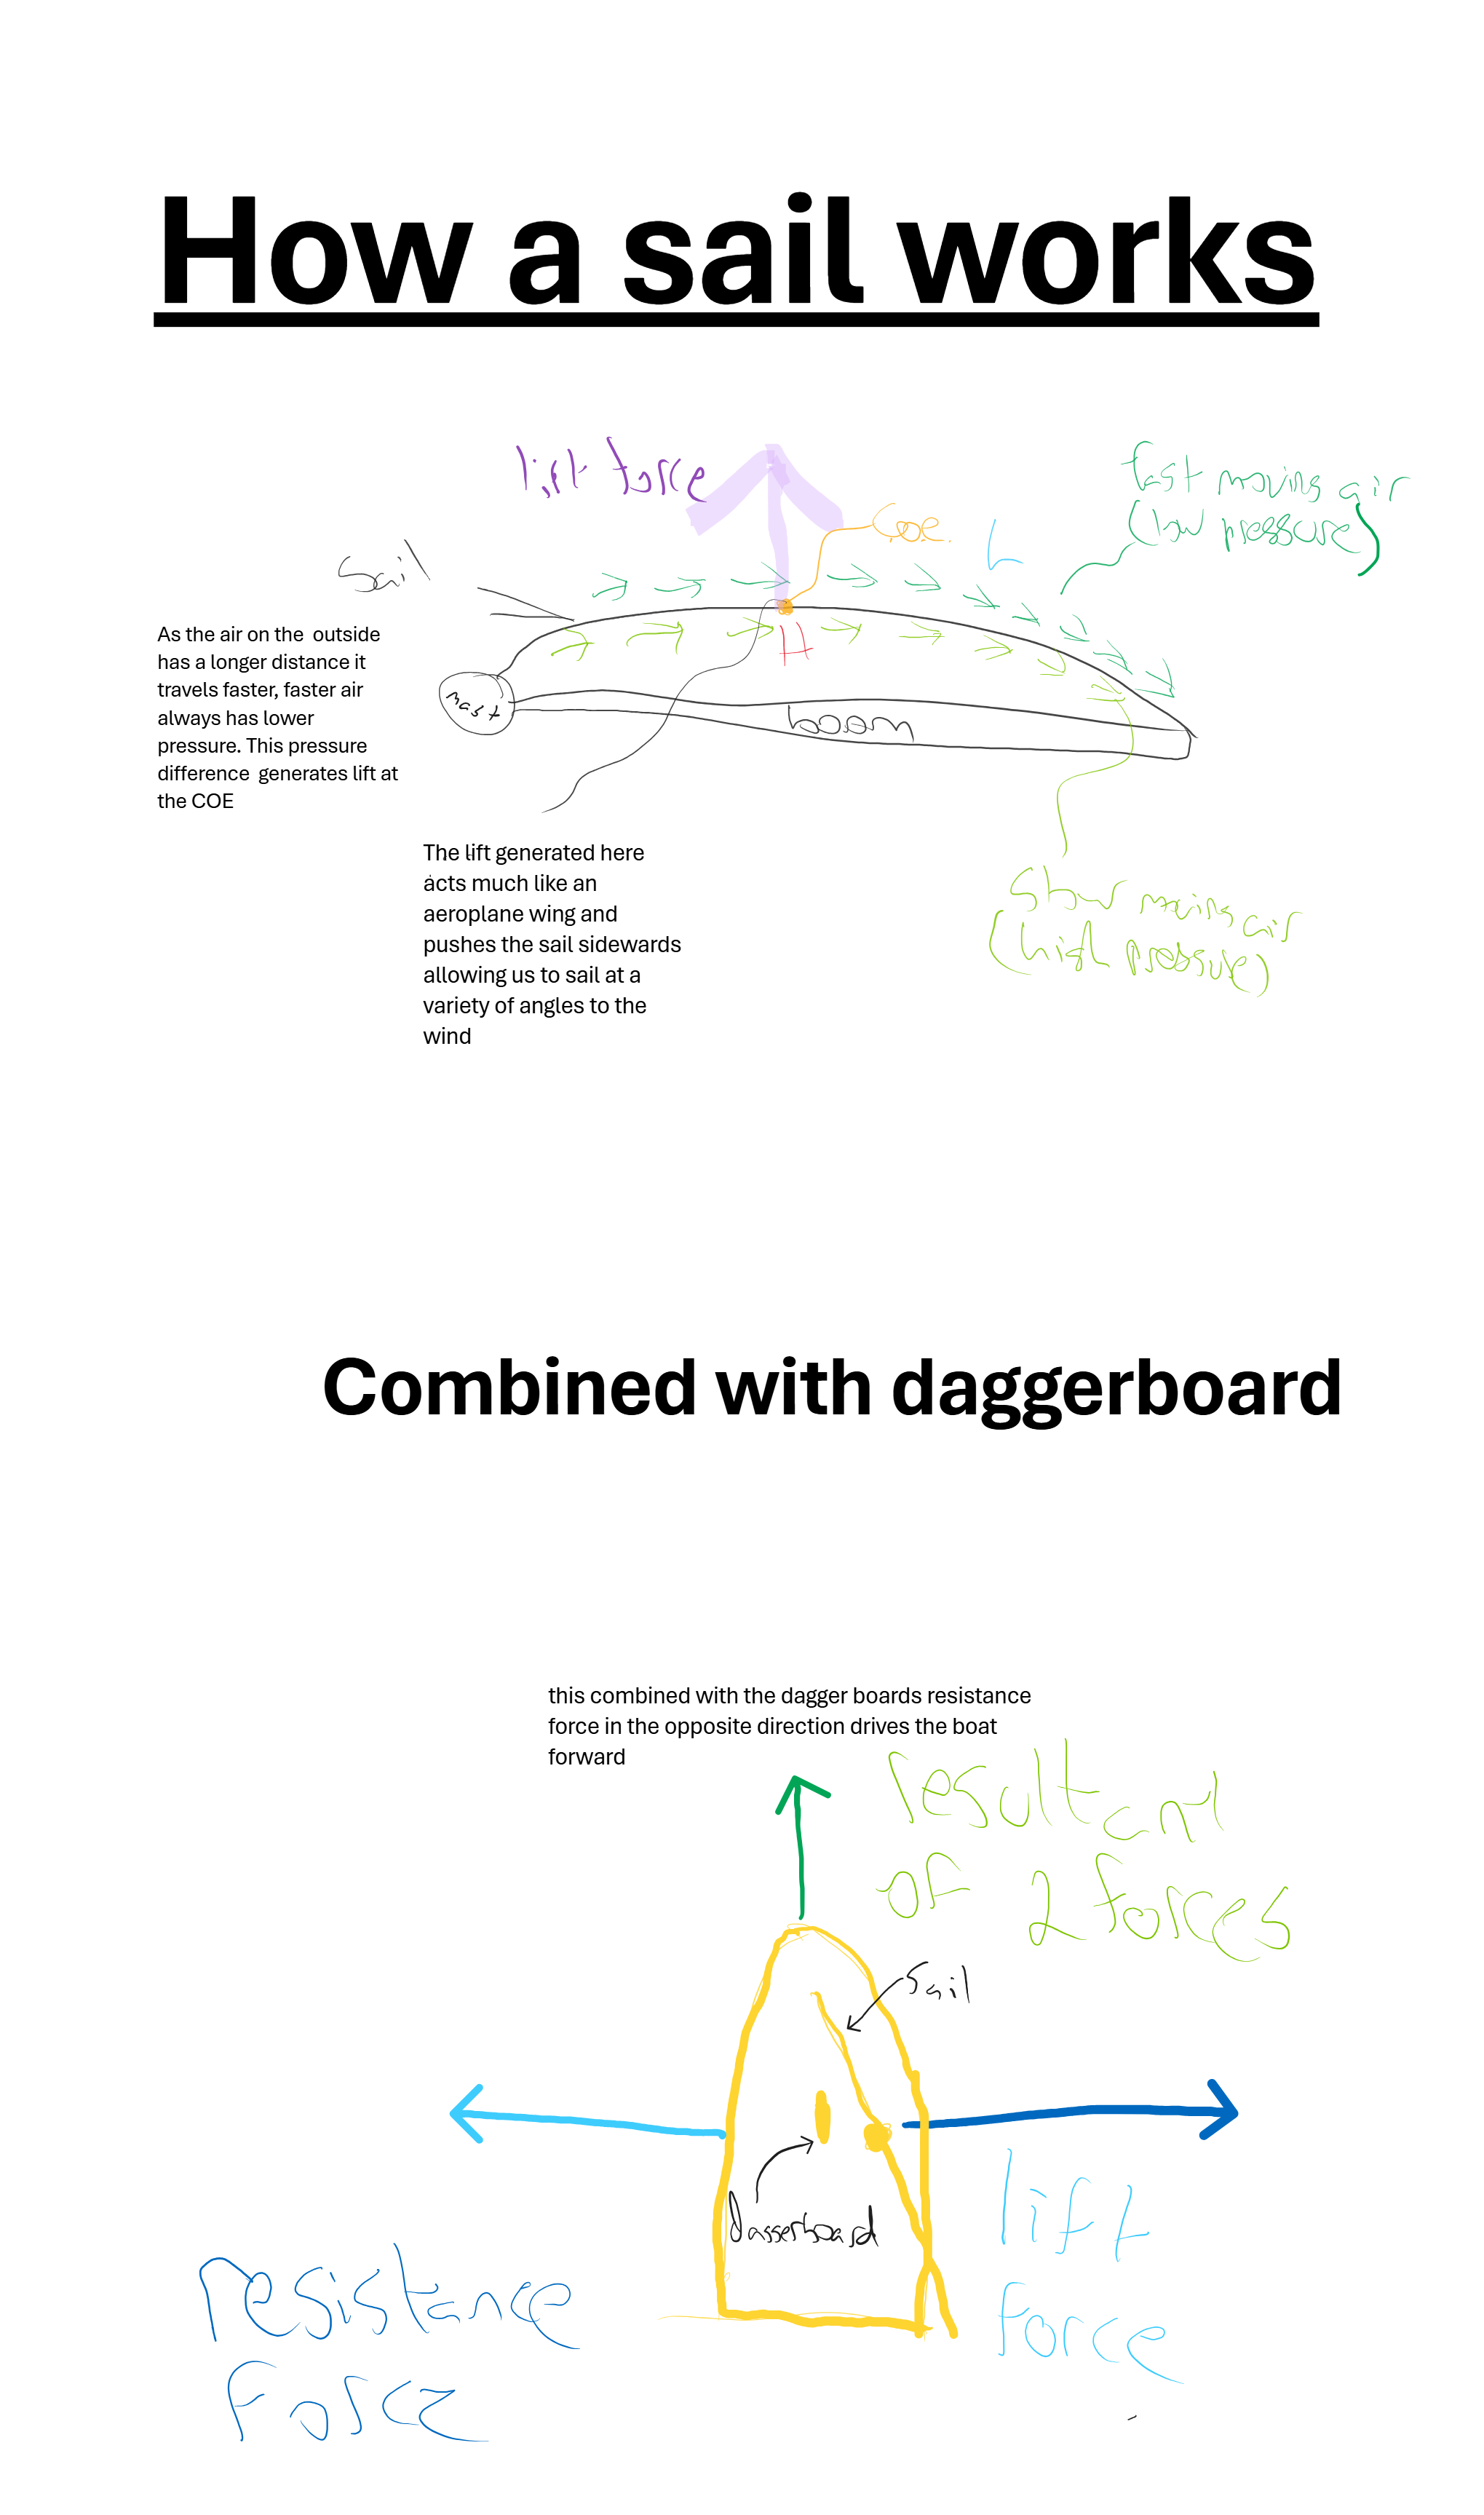
- Can describe how a sail works: You'll discover the fundamental science behind how sails propel a boat. Like an airplane wing, a sail primarily creates lift (a pulling force) rather than just being pushed by the wind. You'll learn:
- Lift Generation: As wind flows over the curved surface of the sail, it creates higher pressure on one side and lower pressure on the other. This pressure difference generates a powerful lifting force that pulls the boat forward, not just pushes it from behind.
- Can describe how a centre / dagger board works: You'll understand the vital role of the centreboard or daggerboard in your boat's performance, particularly when sailing upwind.
- Function: This movable fin extends beneath the hull into the water. Its primary function is to resist the sideways force of the wind on the sails, preventing the boat from being pushed sideways (called leeway).
- Enabling Upwind Sailing: By providing lateral resistance, the centreboard/daggerboard allows the boat to convert the forward component of the sail's lift into efficient forward motion, enabling you to sail effectively towards the wind (close-hauled). Without it, the boat would simply be blown sideways.
- Adjusting for Conditions: You'll also learn how to adjust its depth – typically fully down for upwind sailing, and partially or fully up for downwind sailing to reduce drag.
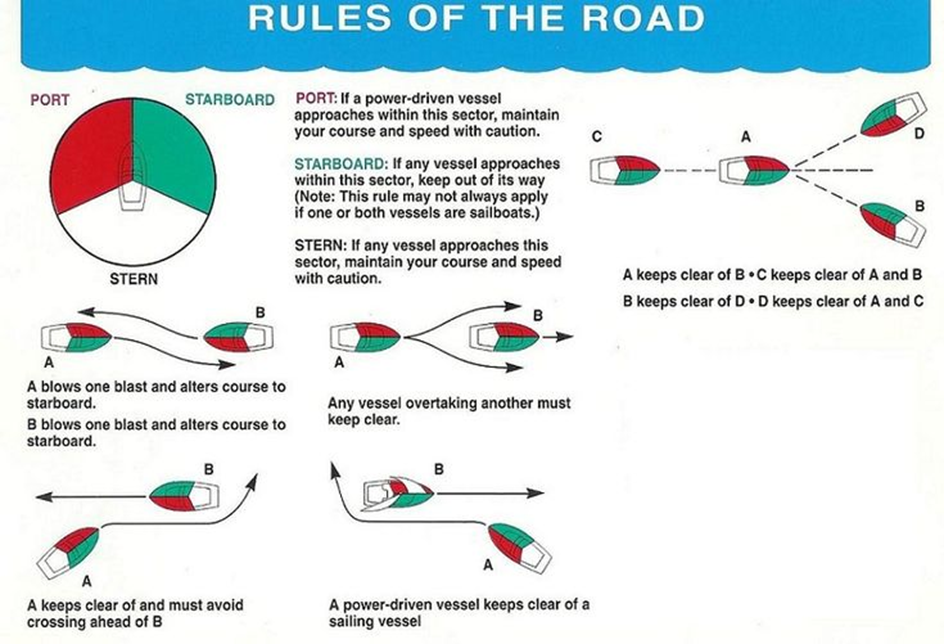
Collision Avoidance: Rules of the Road
Understanding and applying the maritime "Rules of the Road" is paramount to preventing collisions and ensuring safe navigation.
- Can tell if risk of collision exists between two boats: You'll develop the crucial ability to quickly assess whether a risk of collision exists between your boat and another vessel. The key indicator is if the bearing to the other vessel remains constant while the range (distance) is decreasing. If you observe another boat remaining in the same relative position on your horizon (e.g., always appearing off your port bow) but getting closer, a collision risk exists, and immediate action is required.
- Can describe what should happen when: You'll learn the specific "Rules of the Road" governing interactions between different types of vessels and between sailboats in various scenarios:
- A motorboat and sailing boat meet: Generally, a power-driven vessel (motorboat) must give way to a sailing vessel under sail. However, a sailing vessel should not impede the safe passage of a large vessel restricted in its ability to manoeuvre (e.g., a commercial ship in a narrow channel).
- Two sailing boats on the same tack meet: When two sailing boats are on the same tack (meaning the wind is coming from the same side for both boats), the leeward boat (the one further downwind) has the right of way. The windward boat (the one further upwind) must keep clear. You'll learn to actively identify your position relative to other sailboats on the same tack to determine who is the stand-on vessel (maintains course and speed) and who is the give-way vessel (takes avoiding action).
- Boats are being overtaken: Any vessel overtaking another vessel is the give-way vessel, regardless of type. The vessel being overtaken is the stand-on vessel. You'll learn that the overtaking vessel must keep clear of the vessel being overtaken until it is past and clear. This rule applies equally to sailboats overtaking other sailboats, or powerboats overtaking sailboats, etc.
Coastal Knowledge: Understanding Tides and Tidal Streams
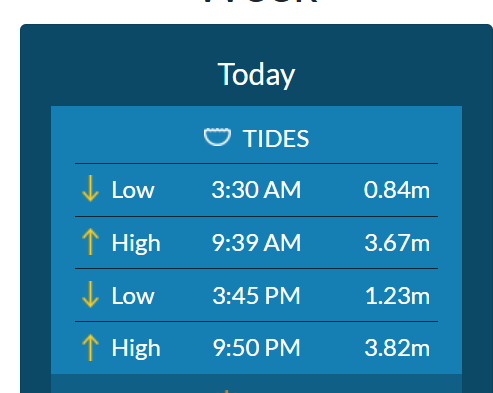
Understanding Tides
- Can identify when high and low tide occur using local tide tables: You'll learn how to interpret local tide tables to accurately determine the times of high and low water in your specific sailing area. You'll understand how to read the tables to find the predicted heights of the tide and the times at which high and low water will occur on any given day. This enables you to plan your sailing activities to coincide with favorable water depths, avoid grounding in shallow areas, and ensure access to harbors and slipways.
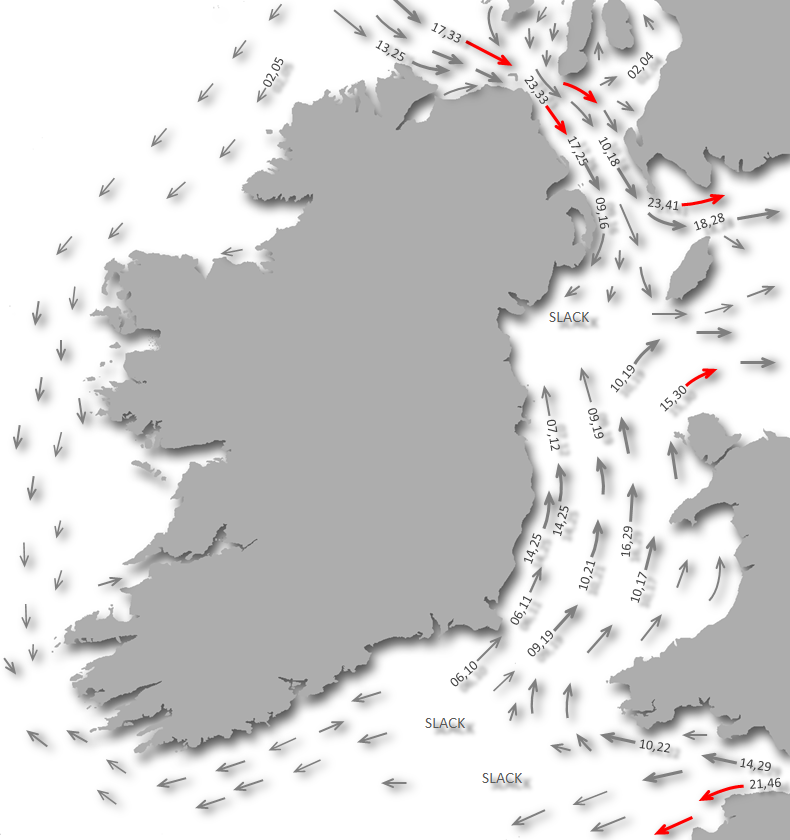
Understanding Tidal Streams
- Can describe how to estimate the rate and direction of the flow of tide and describe the effect that this might have on a sailor: You'll learn how to estimate the rate (speed) and direction of the tidal stream (the horizontal movement of water caused by the tides). This is crucial because tidal streams can significantly affect your boat's speed and direction over the ground.
- Estimating Rate and Direction: You'll learn to use tidal stream atlases, charts, and local knowledge to predict the direction and speed of the tidal stream at various times and locations. You'll understand how the tidal stream changes throughout the tidal cycle and in different areas. (Rule of Twelfths)
- Effect on a Sailor: You'll understand how a favorable tidal stream can significantly increase your boat's speed towards your destination, while an opposing tidal stream can slow you down or even push you backwards. You'll learn how to factor the tidal stream into your navigation to make accurate course corrections, avoid being set off course, and time your passages to take advantage of favorable flows.
Weather: Understanding Conditions for Safe Sailing
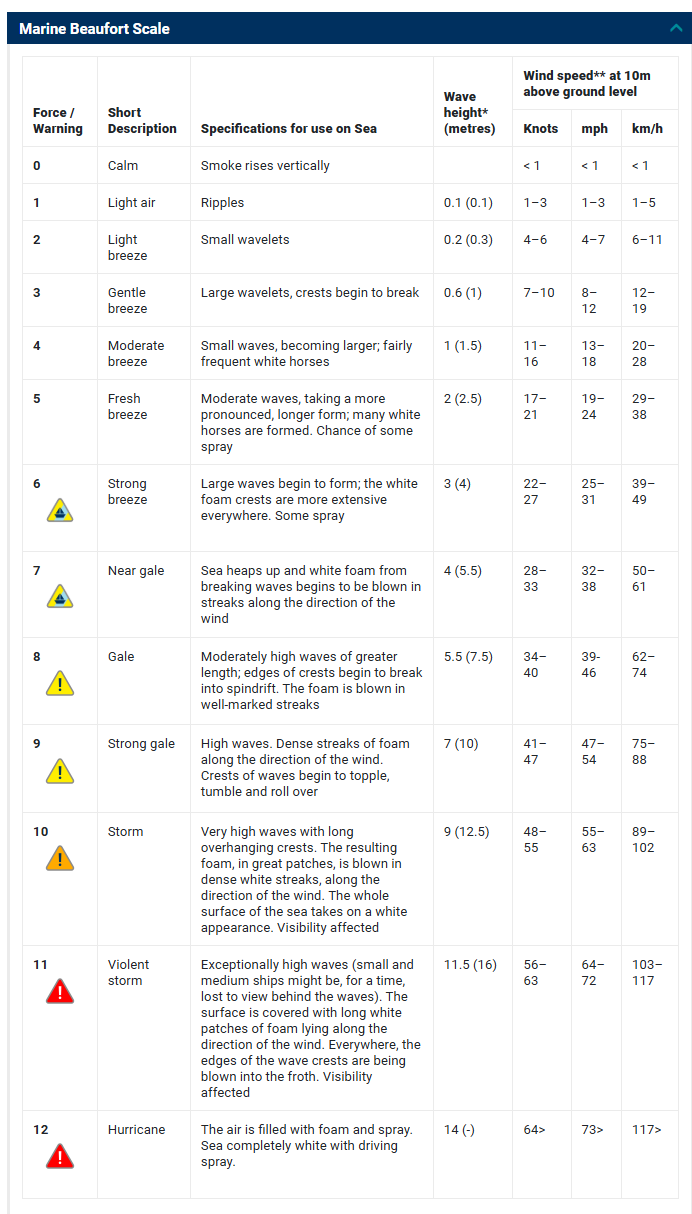
- Can describe how wind direction is measured and how it may affect a sailor: You'll learn that wind direction is measured using compass headings (e.g., from the North, South-West, etc.). You'll also understand its critical implications based on its relation to the land:
- Onshore Winds: These blow towards the land from the water. They generally provide a 'safety net', pushing you towards shore if you have difficulty. However, they can also create choppy conditions near the coast and make landing more challenging.
- Offshore Winds: These blow away from the land towards the open water. They present a significant safety concern as they can push you further offshore if you lose control or suffer equipment failure, making it harder to return to safety. They often create flatter water closer to shore.
- Effect on Sailor: Wind direction dictates your boat's course relative to the wind (points of sailing) and influences tactics for leaving and returning to shore and managing waves.
- Can describe how visibility is measured and how it may affect a sailor: You'll learn that visibility is measured in nautical miles or meters.
- Effect on Sailor: Reduced visibility significantly increases the risk of collision.
- Hazards associated with fog: Fog is a common cause of severely reduced visibility. In fog, it becomes extremely difficult to see other vessels, navigation marks, or land. This necessitates slowing down, making sound signals (e.g., foghorn), and relying more on compass bearings and charts, as well as keeping a vigilant lookout for hazards.
- Can describe how temperature is measured and how it may affect a sailor - Actual and effects of wind chill: You'll understand the importance of air and water temperature and the concept of wind chill.
- Actual Temperature: This is the ambient air temperature, measured in Celsius. Water temperature is also vital, especially for immersion.
- Wind Chill: This is the apparent temperature felt on exposed skin due to the combined effect of air temperature and wind speed. Even on a moderately cold day, a strong wind can make it feel much colder, significantly increasing the risk of cold-related injuries.
- Effect on Sailor: Low temperatures and wind chill can lead to rapid heat loss from the body, increasing the risk of hypothermia (dangerously low body temperature). This necessitates appropriate clothing choices (layers, waterproofs), and awareness of how quickly conditions can lead to cold stress.
- Can obtain a weather forecast for a sailing area and describe how it might affect their planned activities: You'll learn to actively seek out and interpret reliable weather forecasts for your specific sailing area.
- Sources: You'll know where to find forecasts (e.g., reputable marine weather websites and apps, marine radio broadcasts, local sailing club boards, or your instructors).
- Application to Planning: You'll learn to analyse key elements of the forecast (wind speed/direction, visibility, temperature, precipitation) and describe how they might affect your planned activities, such as:
- Deciding whether to sail at all.
- Choosing appropriate sail area (e.g., reefing).
- Planning your route to take advantage of or mitigate wind/tide effects.
- Selecting suitable clothing and safety equipment.
- Adjusting your expected return time.
Safety: Essential Practices and Emergency Response
Pre-Sailing Safety Planning
- Can explain the importance of telling someone where they are going and when they will be back: You'll understand in detail why it is super important to always tell someone ashore (like your instructor, family, or a sailing centre contact) where you're going sailing and when you expect to be back. This is known as leaving a "passage plan" or "shore contact details."
- Importance: This is a crucial safety rule because if you don't return as expected, someone will know to raise an alert. They will have vital information about your intended route, destination, and expected return time, significantly aiding any potential search and rescue efforts. It ensures that help can be summoned promptly if you encounter unforeseen difficulties.
Emergency Equipment and Care
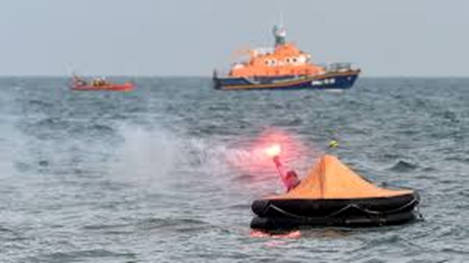
- Can describe how to use and care for distress flares: You'll learn about several types of distress flares (e.g., handheld red flares for close-range signalling, parachute flares for long-range visibility) and understand their purpose as visual emergency signals.
- Use: You'll learn the proper procedure for deploying flares safely according to their instructions, emphasizing pointing away from yourself and others, and ensuring they are visible to potential rescuers.
- Care: You'll understand the importance of storing flares in a dry, accessible location, checking their expiry dates (as they must be in date to be legally carried and effective), and disposing of expired flares responsibly.
Main Types of Distress Flares (Commonly Carried on Boats):
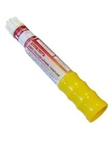
- Red Handheld Flare:
- Appearance: A cylindrical tube, often with a handle. When activated, it produces a bright, steady red flame.
- Purpose: Short-range distress signal, primarily for pinpointing your location to rescuers who are already in sight or relatively close. It's used to show your exact position.
- Burn Time: Typically burns for about 60 seconds.
- Red Parachute Flare (Rocket Flare / Red Star Signal):
- Appearance: A larger, rocket-like tube. When activated, it fires a projectile high into the air.
- Purpose: Long-range distress signal. The projectile deploys a flare on a small parachute at altitude, which burns brightly as it descends slowly. This is used to attract attention from a significant distance (e.g., to distant ships, aircraft, or shore stations).
- Altitude: Can reach 300 meters (approx. 1000 feet) or more.
- Burn Time: Typically burns for about 40-60 seconds.
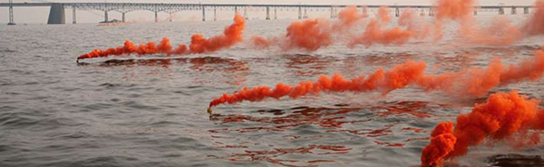
- Orange Smoke Signal (Handheld or Floating):
- Appearance: A cylindrical canister. When activated, it produces dense orange smoke. Can be handheld or designed to float on the water.
- Purpose: Daytime distress signal. The vivid orange smoke is highly visible against the sky or water, especially from aircraft or boats during daylight hours.
- Burn Time: Typically produces smoke for 60-120 seconds.
- White Handheld Flare (or White Collision Warning Flare):
- Appearance: Like a red handheld flare, a cylindrical tube that produces a bright white flame.
- Purpose: Not a distress signal. Instead, white flares are used as a collision warning signal or for illumination.
- Collision Warning: If you believe another vessel is on a collision course with you and doesn't seem to be taking appropriate avoiding action (especially at night or in low visibility), a white flare can be used to attract their attention and warn them of your presence or danger. It's a "warn-off" signal.
- Illumination: They can also be used to briefly illuminate an area, for example, to get a better look at a navigation mark, a mooring buoy, or a person in the water at night. This is particularly useful in an emergency like a man overboard at night, to help a searchlight locate the person.
- Burn Time: Typically burns for about 60 seconds.
Emergency Care
- Can describe how to care for someone who is very cold: You'll learn to recognize the signs of hypothermia (dangerously low body temperature), such as shivering, confusion, slurred speech, and clumsiness. You'll then learn simple yet effective ways to help someone who is very cold:
- Remove Wet Clothing: Get them out of any wet clothes immediately.
- Insulate and Warm: Wrap them in dry blankets, sleeping bags, or foil emergency blankets to prevent further heat loss and begin warming them slowly.
- Provide Warmth (if conscious): Offer warm, sweet drinks (non-alcoholic) to help warm them from the inside. Avoid rubbing their limbs.
- Seek Professional Help: Always monitor their condition and seek professional medical attention as soon as possible.
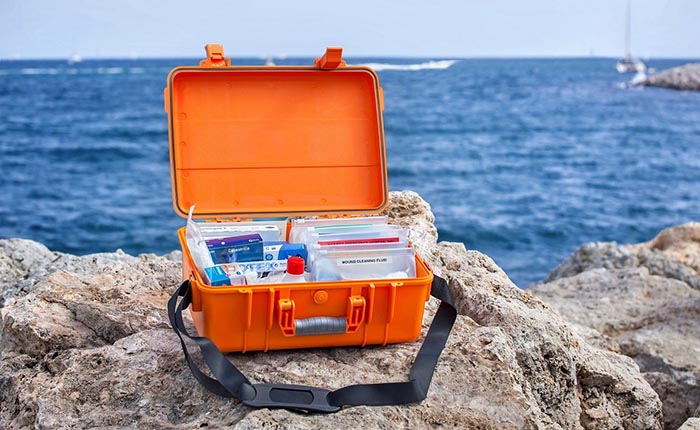
- Can explain why it is important for a sailor to have some training in Emergency Care: You'll understand that having some basic training in Emergency Care (First Aid) is incredibly helpful for sailors.
- Preparedness: Minor cuts, scrapes, sprains, or even more serious incidents can occur while sailing. Basic first aid knowledge empowers you to confidently manage common injuries and illnesses.
- Bridging the Gap: On the water, professional medical help may not be immediately available. Emergency care training enables you to provide immediate assistance, stabilize a casualty, and potentially prevent a situation from worsening while awaiting professional medical attention.
What Next?
You'll get advice on how to continue sailing and improve your skills even further after finishing this course, perhaps joining a racing club or exploring new sailing areas.